Using Clarizen Expense Sheets for POs
Table of Contents:
- Expense Sheets Overview
- Viewing Expense Sheets
- Prepare a Project for Expenses
- Create & Submit an Expense Sheet for Approval
- Review and Approve OR Defer/Reject an Expense Sheet
- Request an Increase or Decrease to an Approved Expense Sheet
- Reconcile an Expense Sheet
- Close a PM-Reconciled Expense Sheet
- Move an Expense Sheet from One Parent Project to Another
- Appendix: Revenue Departments & Expense Categories
PO and Expense Sheets Overview
A purchase order (PO) is required to be approved by Finance prior to making any purchases/incurring non-labor (time) costs on a project. A campaign (transfer level) must be marked "Finance Approved" by the Finance Director in order to submit an Expense Sheet. "Finance Approved" indicates that TSL has been paid for the initial project invoice and we are comfortable incurring project costs.
Production team members must obtain a PO number from the project manager before moving forward with a purchase.
Expense Sheets are our Clarizen-based PO Request forms that are related to a single campaign, and contain information about an outsourced cost for a project. The Expense details within the Sheet include the vendor, amount, approval status, and more. Create an Expense Sheet to submit a PO Request to Finance so that there is one PO open for each vendor being paid out for a campaign.
Adding an Expense Sheet to a campaign factors the non-labor costs into the campaign to accurately calculate profit. As the Expense Sheet “State” changes throughout the approval processes the Expense dollar amount will be reflected in different financial fields as shown below.
| Expense Sheet State | Draft | Submitted (Pending Approval) | Approved | |||
| Finance Field on the Project | N/A Amount does not impact project | Projected Expenses | Actual Expenses |
Actual Cost (Includes Expense Amount + Labor Cost from Resource Timesheet Entries) |
Revenue EV | Actual Revenue |
Project types that require and do not require Expense Sheets are outlined below.
| Require an Expense Sheet (Examples) | Do Not Create an Expense Sheet For |
|
|
Viewing Expense Sheets
Lists of Expense Sheets related to a campaign are displayed by using the Management View on the parent project level. The Expense Sheet module is located below the Work Plan. Note that if there are no Expense Sheets related to the campaign, the Expense Sheet module will not appear.
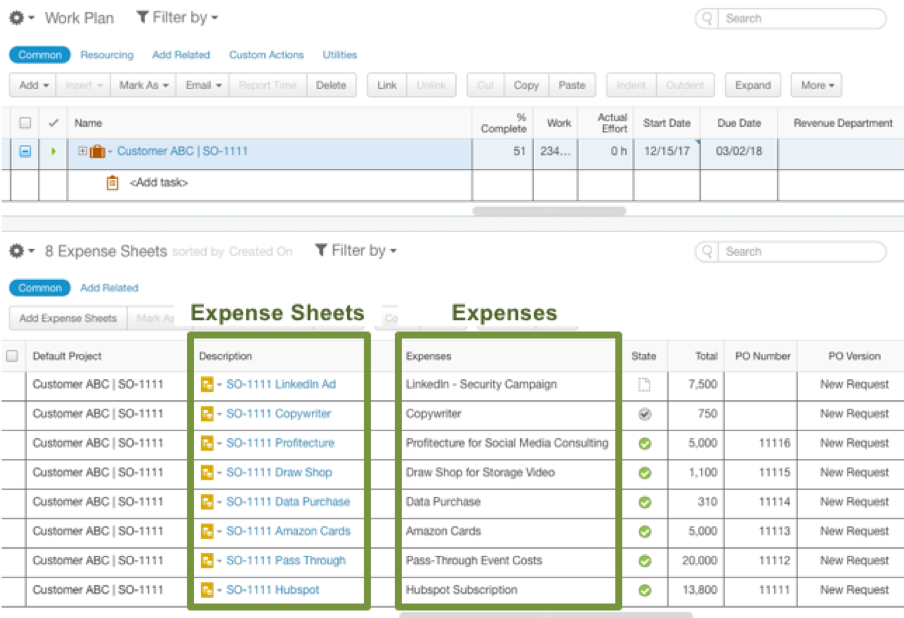
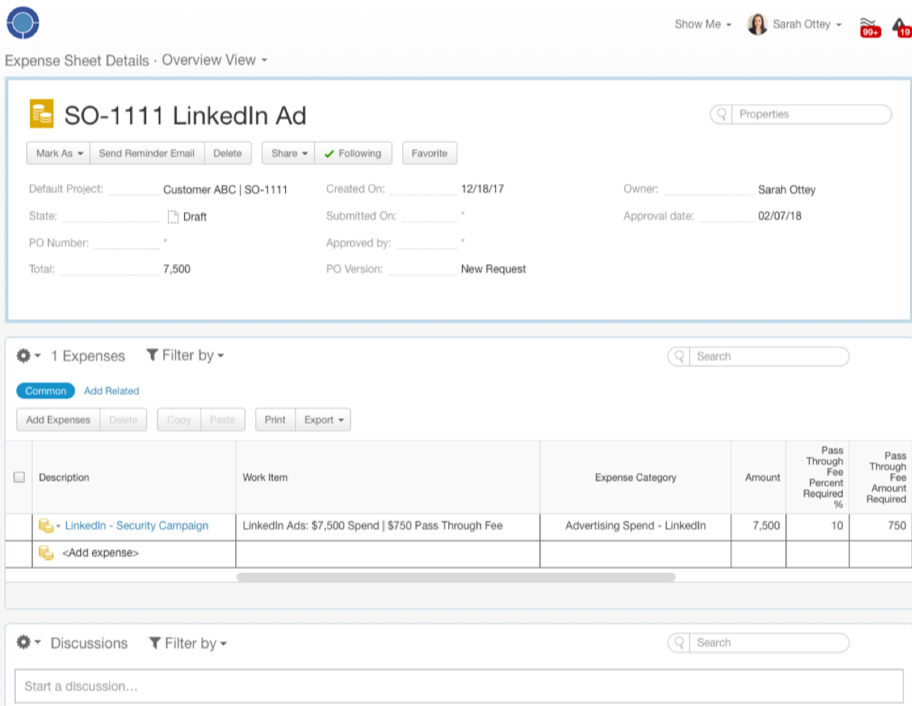
Click the Expense Sheet "Description" hyperlink to view the Expense Sheet Details page below.
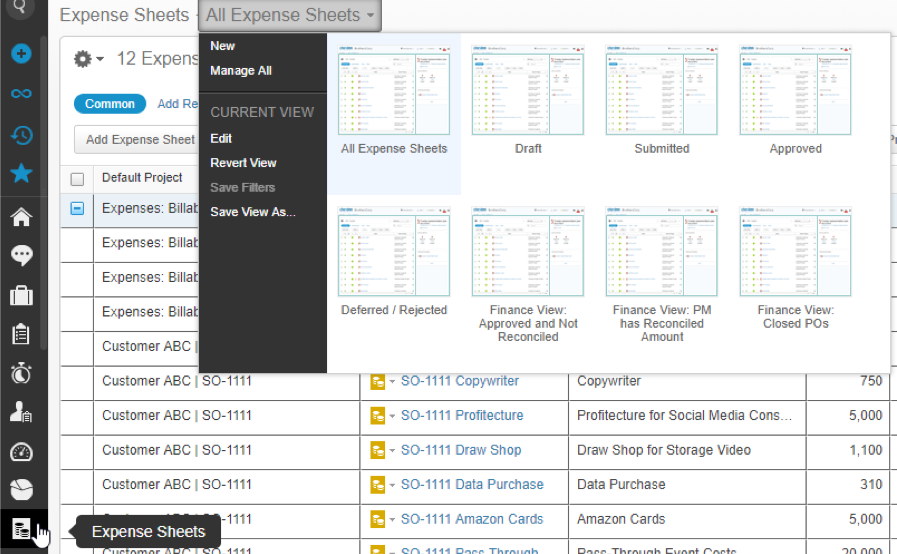
Use the following Views within the Expense Sheets module to view Expense Sheets across campaigns.
- All Expense Sheets: Unfiltered, and shows all Expense Sheets in the system.
- Draft: Still in planning and must be Submitted to request approval.
- Submitted: Submitted and require Finance action (Approve or Reject).
- Approved: Approved by Finance.
- Deferred/Rejected: Rejected and require manager action and edits.
- Finance View: Approved and Not Reconciled: Expense Sheets that have been Approved with the original PO Amount. Manager has not revised the Amount or marked as Reconciled.
- Finance View: PM has Reconciled Amount: Expense Sheets that the manager has updated with the actual, final cost. These require Finance action to close.
- Finance View: Closed POs: Expense Sheets that have been reconciled by manager and closed by Finance.
Here is how to use the Expense Sheet Search bar to locate a PO by keyword from the manager's Expense Description. For example, you may want to search by type or vendor name.
You can also search by PO number if you have it. To do so, hover over the PO Number column, click the triangle to open the menu, enter the PO number in the text box, and click OK to filter results in the View.
Prepare a Project for Expenses
- Navigate to the Campaign Parent Project in Clarizen.
- Check the "Discussions" panel for a post from Ken English that states "This campaign is now approved by Finance to incur expenses". This indicates that the customer has paid their initial invoice, so TSL is willing to open a PO and begin incurring costs on the project. If the campaign is not approved, you will not be able to create an Expense Sheet on it. Contact Ken English for status updates.
- Change View to “Management View”.
- Review your campaign to check if there are subprojects for each tactic that will have an expense. Add any that are missing. Note that these services require MULTIPLE subproject templates to properly record the expense:
- Digital advertising
- [Channel] Ads: $x Setup | $x Management
- [Channel] Ads: $x Click Spend | $x Pass Through
- Fulfillment
- Fulfillment: Incentive Costs $x | Pass Through Fee $x
- Fulfillment: Finance Management $x (20% of Incentive Cost)
- Digital advertising
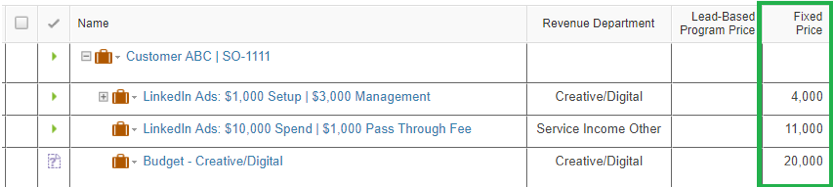
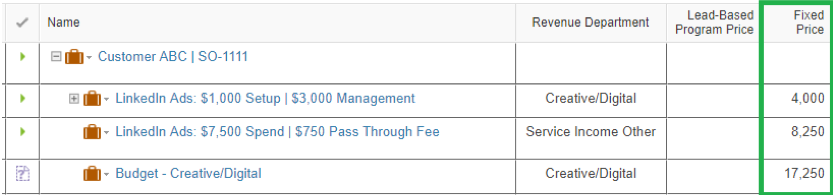
- Review the Fixed Price field on subprojects' milestones for each tactic that will have an expense, and adjust as needed per the following guidelines.
| Service Type | Subproject | "Fixed Price" Field on Milestone Must Include |
| Advertising | [Channel] Ads: $x Setup | $x Management | Setup fee + Management fee |
| [Channel] Ads: $x Click Spend | $x Pass Through | Click Spend + Pass Through fee amounts | |
| All other services | All other service subprojects | TSL Fee including the Expense and related Pass Through fee amounts |
If subproject is for several months of digital retainer work, you must add a milestone to the plan to account for the fee and margin of outsourcing work, as shown here:
Create & Submit an Expense Sheet for Approval
There must be one Expense Sheet and related Expense per cost item. This will allow us to request, approve, reject, increase, decrease, reconcile, and report on each Expense separately. Do not add multiple Expenses to one Expense Sheet.
- Navigate to the Campaign Parent Project in Clarizen.
- Change View to “Management View”.
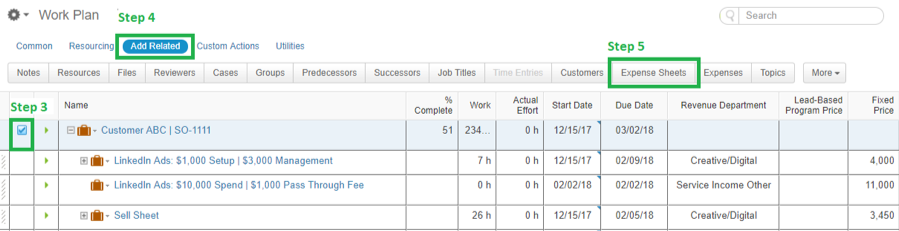
- On the Work Plan grid, highlight the Parent Project using the selection checkbox.
- In the Work Plan menu, click the blue text “Add Related”.
- In the Work Plan menu, click the gray “Expense Sheets” button.
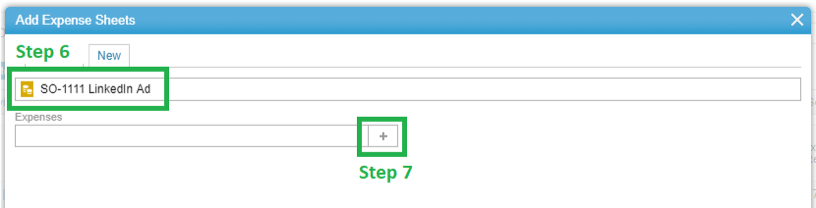
6. In the “Add Expense Sheets” window that opens, rename the Expense Sheet with the Project Transfer Number and expense type.
7. Click the [ + ] button to add Expense details to the Expense Sheet.
8. Enter a simple Description of the Expense.
- You may want to include detail that will help identify this expense from similar ones on the same campaign, i.e. “LinkedIn Security Campaign”, “LinkedIn Power Campaign”
- If the Expense is for a Marketing Automation Platform subscription, follow the naming convention to include the subscription timeframe: "Hubspot Subscription: MO/YEAR - MO/YEAR"
9. Use the “Expense Category” picklist to choose the appropriate expense type. Refer to Appendix on pg. 22 for descriptions and use cases.
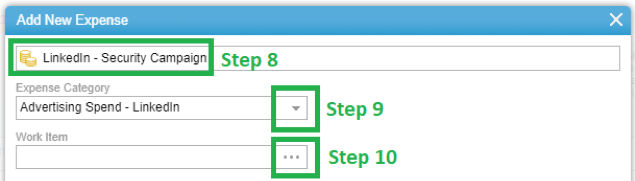
10. Use the "Work Item" picklist to associate the expense to the related project.
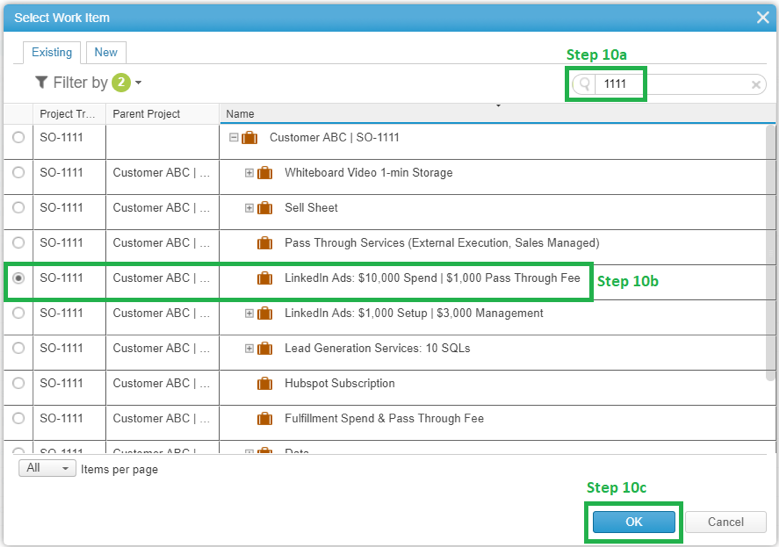
a. Click the three-dot ellipsis to open the picklist. Type the numbers from the Project Transfer Number into the Search bar to locate the campaign.
b. Select the related subproject work item:
i. For Advertising, select the subproject “[Channel] Ads: $x Click Spend | $x Pass Through” which has the Expense Amount included in the Fixed Price.
ii. For all other tactics, select the single related subproject.
c. Click the blue “OK” button.
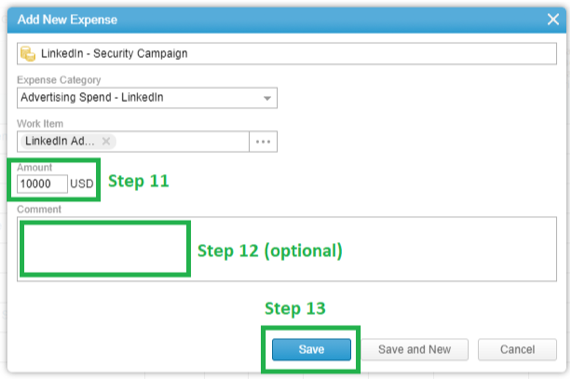
11. In the “Amount” field, enter the dollar Amount of the Expense only. Do not include pass-through fees, margin, setup, or management budget amounts in this field.
12. Optional: If you want to include additional notes for reference, enter a comment about the Expense.
13. Click the blue “Save” button. The Expense Sheet has been created and is in Draft state, and has not yet been submitted for approval.
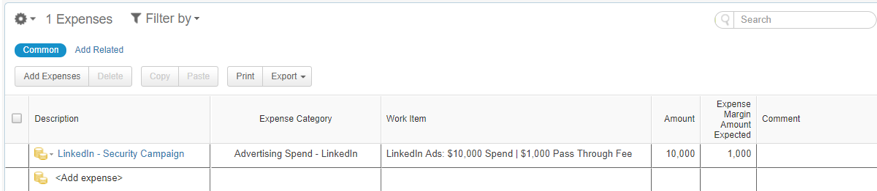
14. Open the Expense Sheet and review details. Confirm that the "Expense Margin Amount Expected" has been accounted for in the related project's Fixed Price.
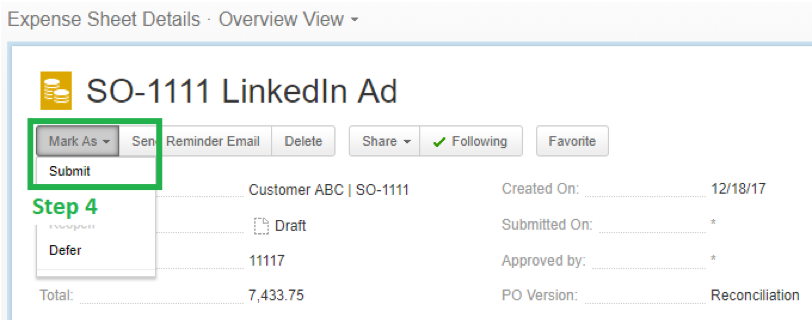
15. Submit the Expense Sheet:
a. On the Expense Sheets grid below the Work Plan, highlight the new Expense Sheet using the selection checkbox.
b. Click the gray “Mark As” button and select the “Submit” option from the picklist. The Finance Approver has been notified via email alert

The “Amount” of the Submitted Expense will appear in the “Projected Expenses” field. Once it is Approved, the Amount will transfer from “Projected Expenses” to “Actual Expenses” field.

Review and Approve OR Defer/Reject an Expense Sheet
Applicable to all PO Versions
Responsible: Finance Approver
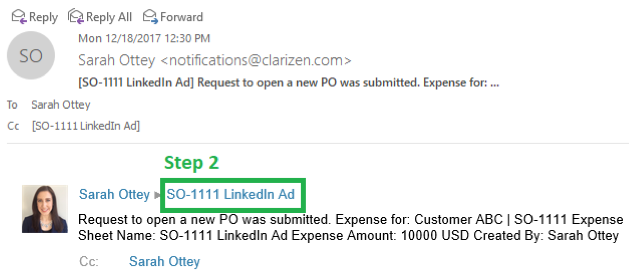
1. Receive Clarizen email alert with subject line, “Request to open a new PO was submitted”.
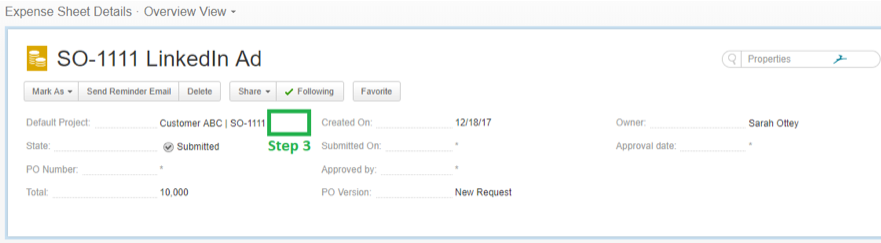
2. Click link in email to open the “Expense Sheet Details” view in web browser and review details submitted.
3. Move cursor over the right side of the “Default Project” name until the gray and white arrow appears. Click the arrow once to navigate to the project the Expense Sheet was submitted against.
4. On the Project Details page, change View to the “Management View”.
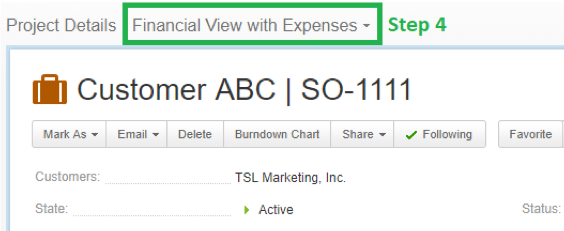
5. Scroll down to the Work Plan to review budget allocated to tactics and expenses as needed.
6. Scroll down to the Expense Sheets section to locate the Expense Sheet in review.
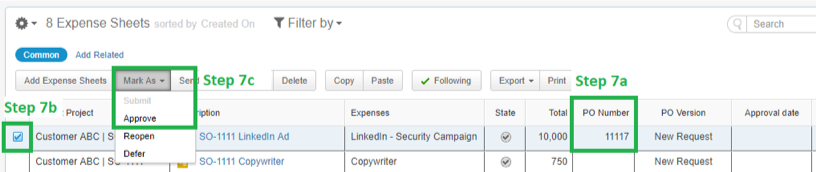
7. If the request will be approved, follow steps in order below. If not, continue to Step 8.
a. Enter the associated PO Number in “PO Number” field.
b. Highlight the Expense Sheet row using the selection checkbox.
c. Click the gray “Mark As” button and choose the “Approve” option from the picklist. The Requestor has been notified via email alert.
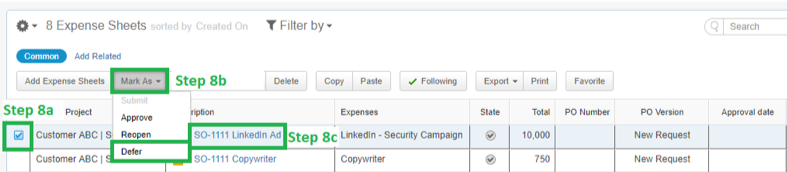
8. If the request will not be approved:
a. Highlight the Expense Sheet row using the selection checkbox.
b. Click the gray “Mark As” button and choose the “Defer” option from the picklist. The Requestor has been notified via email alert.
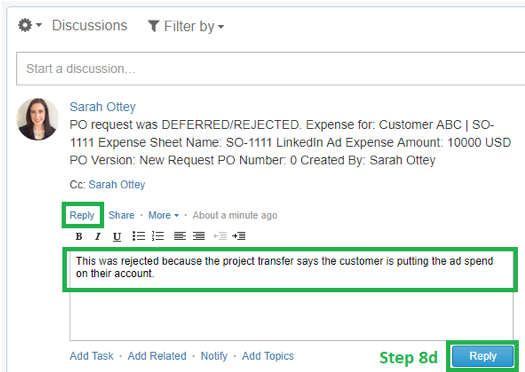
c. Click the hyperlinked Expense Sheet “Description” field to navigate back to the Expense Sheet Details page.
d. In the Discussions panel, “Reply” to the auto-post with a message about why the Expense Sheet was not approved. Click the blue “Reply” button. The Requestor has received the comment via email alert.
Request an Increase or Decrease to an Approved Expense Sheet
1. On the Work Plan, increase or decrease the Fixed Price on the expense-related subproject's milestone and add/update others impacted by the reallocation of budget.
Before Step 1:
After Step 2:
2. Click the hyperlinked Expense Sheet “Description” field to navigate to the Expense Sheet Details page.
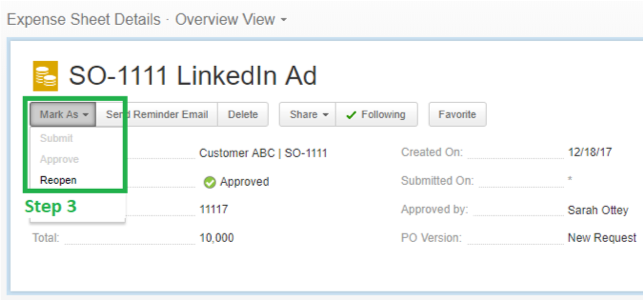
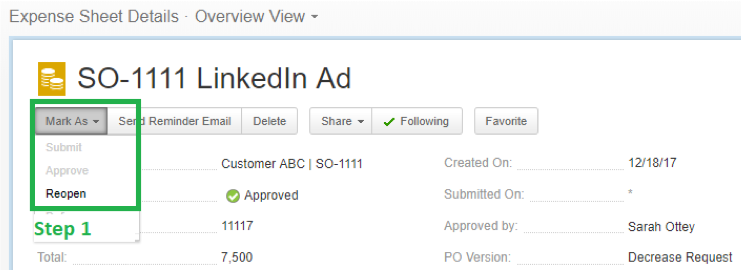
3. Click the gray “Mark As” button and select the “Reopen” option from the picklist. The Expense Sheet's State is now Draft.
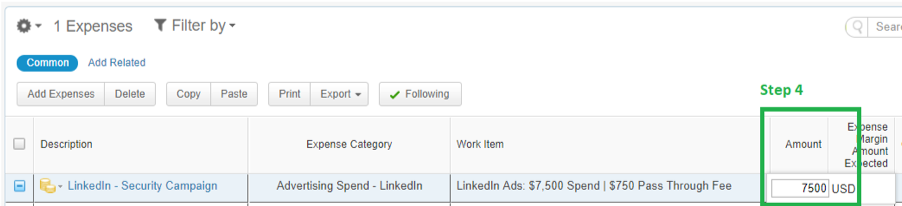
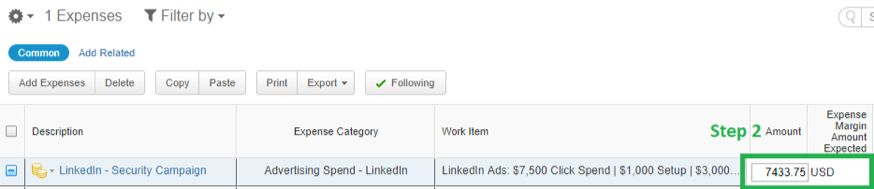
4. Click the Expense Amount field and update with the new amount.
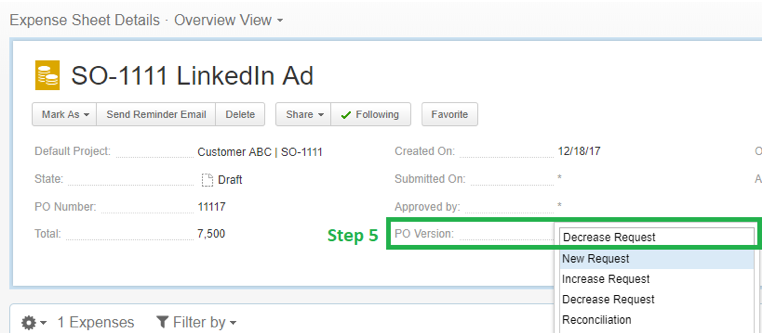
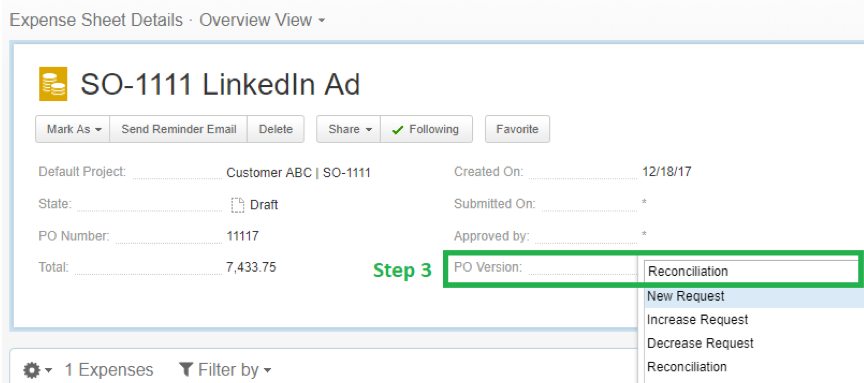
5. Click the "PO Version" field and select "Increase Request" OR "Decrease Request".
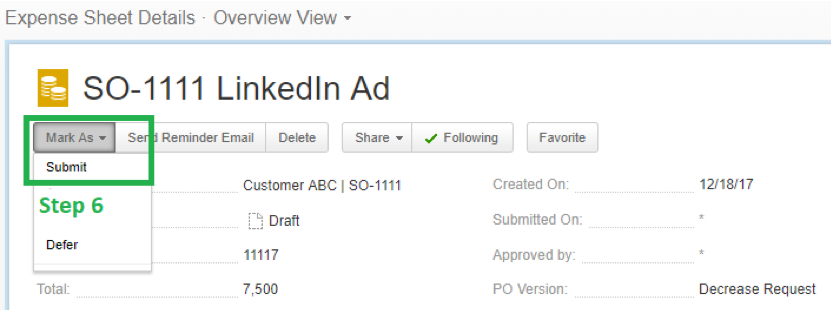
6. Click the gray “Mark As” button and select the “Submit” option from the picklist. The Finance Approver has been notified via email alert. You will receive an email alert when the Finance Approver has processed the Increase or Decrease Request.
Reconcile an Expense Sheet
- This process should be followed as soon as the Expense has been fully spent for its purpose (ie. Ad campaign is fully completed, software license purchase took place).
- Completion of these steps will alert Finance to reconcile the expense in accounting systems, and close the PO.
- The Project Lead must update all Expense Sheets on a campaign in order to fully close the campaign.
- All Expense Sheets should eventually be marked "Reconciliation".
1. On the Expense Sheet Details page, click the gray “Mark As” button and select the “Reopen” option from the picklist.
2. Click the Expense “Amount” field and update with the final, actual spend amount.
3. Click the "PO Version" field and select "Reconciliation”.
4. Click the gray “Mark As” button and select the “Submit” option from the picklist. The Finance Approver has been notified via email alert. They will Approve the Reconciliation and mark the PO as closed, and you will NOT receive a follow-up alert.
5. Revise the Fixed Price on milestones with related costs (click spend, fulfillment, pass-through fee) and other fees (fulfillment management) based on final amounts used.
6. If the PO was reconciled at a lesser amount and there is unused budget, enter the remaining budget on an existing or new subproject (either a placeholder or defined services, as applies).
Video of above process, in context of reconciling a completed campaign project.
Close a PM-Reconciled Expense Sheet
Applicable to PO Versions in “Submitted” State and are marked “Reconciled”
Responsible: Finance Approver
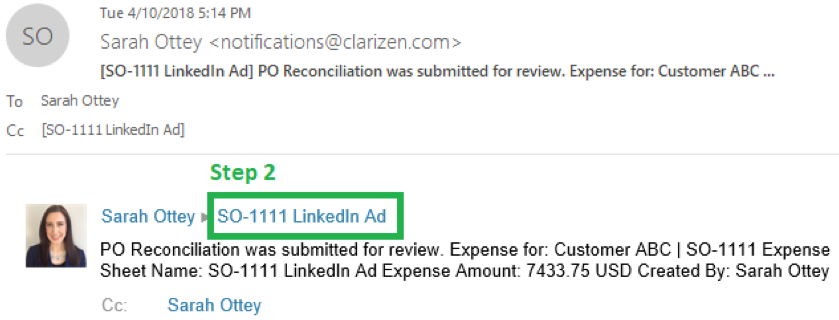
1. Receive Clarizen email alert with subject line, “PO Reconciliation was submitted for review”.
2. Click link in email to open the “Expense Sheet Details” view in web browser and review details submitted.
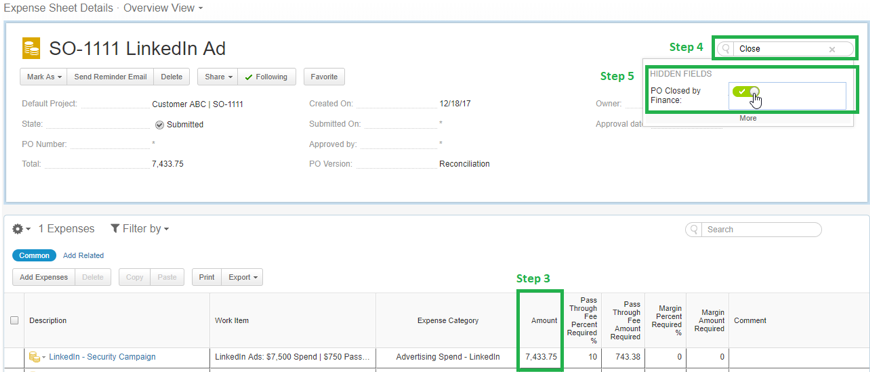
3. The final, actual expense cost can be found in the “Amount” field. Record this amount in separate tracking documents/software per Finance process.
4. Type “Close” in the property card search bar to expose the hidden field, “PO Closed by Finance”.
5. Toggle the button to ON/GREEN to indicate that the PO is closed in all tracking systems.
Move an Expense Sheet from One Parent Project to Another
This scenario may come up if you've initiated a PO on one project transfer but need to move it if funds are not available to cover costs, or if a new budget is transferred retroactively to cover the cost.
Appendix: Revenue Departments & Expense Categories
The “Revenue Department” and “Expense Category” selected will be used to categorize and report on budgets, revenue recorded, and expenses. If you are unsure how to categorize your project or expense, please reach out to Sarah Ottey or Ken English for confirmation.
| Project Type | "Revenue Department" where revenue will be reported (Pre-selected on Templates) | If Expense is required, submit under "Expense Category" | Minimum Required Margin or Pass Through Fee | Expense Category Use Cases & Notes |
| Data | Data | Data Purchase | -- | Contact list purchase |
| BDTM Commission and Bonuses | Service Income Other | Commission and Bonuses | 10% margin | |
| Social Media Execution by TSL Academy | Creative/Digital | Alliance Partner - TSL Academy | 50% margin | TSL Academy social media execution (curation, management) led by Paul Krappman, Denise Bahs, Victoria Bianchini |
| Consulting by TSL Academy | Consulting | Alliance Partner - TSL Academy | 50% margin | TSL Academy training led by Paul Krappman, Denise Bahs, Victoria Bianchini |
| Pass-Through Services (IBM Stars) | Service Income Other | IBM Stars Pass-Through | 30% PTF | IBM Stars program only |
| Pass Through Services (External Execution, Sales Managed) | Service Income Other | Pass Through (TSL Secured Funding, Not Executing) | 9% PTF | TSL helped submit the claim to secure funds, and amount is being spent through other agencies, vendors, etc. |
| Fulfillment: Incentive Costs $x | Pass Through Fee $x Service Income Other |
Fulfillment - Gift Cards/Promo | 10% PTF | If using Amazon or other vendor for direct incentive/gift fulfillment | |
| Fulfillment - GrubHub "Meal Credits" (not gift cards) |
6% vendor service charge AND 10% TSL PTF |
Example:
$50 recipient meal credit x 1.06 = $53 cost to fulfill. X 1.10 = $58.30 cost per meal credit to budget for in plan |
||
| Print, Postage, Promotional Items | Creative/Digital | Fulfillment - Print/Postage | 30% margin | Creative or physical item print production & shipping (ex. BFI) |
| Whiteboard Video | Creative/Digital | Alliance Partner - The Draw Shop | 30% margin | Outsourced video production to The Draw Shop |
| Facebook Ads: Setup $x | Management $x | Creative/Digital | N/A - Do not log expense on setup/management | -- | Advertising setup and management fee for execution |
| Facebook Ads: Spend $x | Pass Through Fee $x | Service Income Other | Advertising Spend - Facebook | 10% PTF | Advertising spend and Pass Through Fee |
| Google Ads: Setup $x | Management $x | Creative/Digital | N/A - Do not log expense on setup/management | -- | Advertising setup and management fee for execution |
| Google Ads: Spend $x | Pass Through Fee $x | Service Income Other | Advertising Spend - Google | 10% PTF | Advertising spend and Pass Through Fee |
| LinkedIn Ads: Setup $x | Management $x | Creative/Digital | N/A - Do not log expense on setup/management | -- | Advertising setup and management fee for execution |
| LinkedIn Ads: Spend $x | Pass Through Fee $x | Service Income Other | Advertising Spend - LinkedIn | 10% PTF | Advertising spend and Pass Through Fee |
| Hubspot Subscription | Service Income Other | Hubspot | 0% | Software purchase with no markup |
| HubSpot theme - Sprocket Rocket or other | Creative/Digital | HubSpot | 30% margin | |
| Hotjar | Creative/Digital | Hotjar | 30% margin | Customer-specific account |
| Hootsuite | Creative/Digital | Hootsuite | 30% margin | Customer-specific account |
| MailChimp | Creative/Digital | Mailchimp | 30% margin | Customer-specific account |
| Digital Execution | Creative/Digital | Alliance Partner - Developer | "Bill" time at $175/hour compared to $110/hour cost | Pre-project fees incurred by using part-time 1099 outsource partner Kevin Lucca |
| Creative Content, Digital Execution | Creative/Digital |
Alliance Partner - Copywriter Alliance Partner - Developer Alliance Partner - Designer |
30% margin |
Pre-project fees incurred by using part-time 1099s outsource partners such as Mike G., Jamie T., etc. Do not log expenses for full-time 1099s who log time in Clarizen. |
| Alliance Partner - Other | 30% margin | Any per-project fees incurred by outsourcing work to individuals or companies which do not fall in defined categories | ||

